
How to use air tightness testing equipment correctly?Practical guide here
Air tightness testing is an indispensable part of modern industry and daily life.Whether it is ensuring the waterproof performance of mobile phones or testing the safety of diving equipment, air tightness testing is a crucial part.Among the dazzling array of air tightness testing equipment on the market, the Hiraysi brand has been favored by the majority of users for its excellent performance and high precision.However, the effectiveness of even high-end equipment will be greatly reduced if used improperly.Therefore, this article will provide you with a detailed guide to help you correctly use the Hirays airtightness testing equipment to ensure that every test is accurate.
Whether you are new to air tightness testing equipment or a veteran who has been working in the field of industrial testing for many years, this guide will provide you with valuable information.We will analyze each step in detail, from the basic settings of the device to the troubleshooting of common problems, so that you can use it smoothly and avoid detours.Fasten your seatbelts and prepare to embark on a reading journey full of knowledge and fun!
1. Equipment installation and preliminary inspection
Don’t underestimate the installation process.Whether you’re one of the tech-savvy folks or a “novice” representative, a bad installation can lead to endless trouble and data inaccuracies.Are the installation steps complicated?In fact, this is not the case. As long as you proceed step by step, everything will become simpler.
- Choose the installation location: Make sure the airtight testing equipment is placed in a stable, shock-proof, and dust-proof place.If the equipment needs to be installed in a laboratory or production line, remember to leave enough operating space.
- Connect the power supply: Check whether the power supply meets the equipment requirements and all cables are connected correctly and reliably.Also ensure that there are no obstacles around the test equipment that may affect the normal operation of the equipment.
- Preliminary inspection: Before starting up, carefully inspect the equipment for any visible external damage or loose connecting parts.Remember, don’t let “visual inspection” become formalism.We cannot underestimate these small faults, they may become the source of big problems in the future.
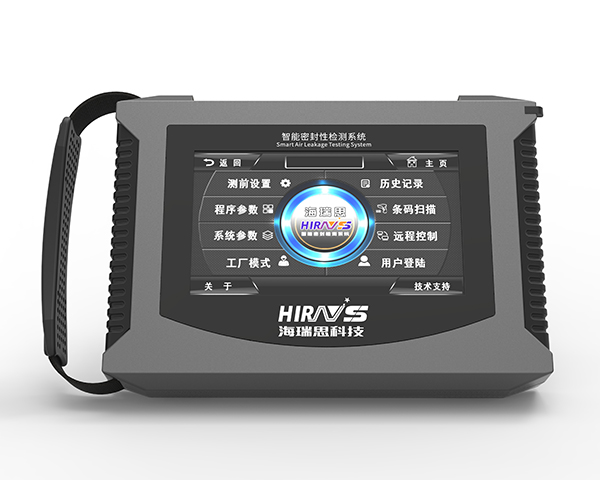
2. Equipment calibration and settings
Once the installation is complete, the next step is calibration and setup.This step is crucial and directly related to the accuracy of the test results.You don’t want to find out after painstakingly completing a test that all the data is useless, right?
- Calibration of equipment: Calibration should first be carried out according to the steps in the equipment instruction manual.If the manual has a special calibration procedure, you can directly follow the instructions.Remember, each device may require different calibration tools or methods, so don’t be careless.
- Setting parameters: The parameter settings required under different test conditions are also different.Enter relevant parameters such as test pressure, duration and leakage limit according to the type of product to be tested and specific requirements.For different products, adjusting parameters may be tedious but necessary.
- Conduct a trial run: Conduct one or two trial runs before formal testing to ensure that everything is as expected.If any problems are found during the trial operation, make adjustments and corrections in a timely manner.
3. Connect the product and equipment under test
The next step is to correctly connect the product under test to the device. Don't worry, this is a logical step.If your previous operations went smoothly, then this level will be no problem.
- Choose the appropriate connector: Choose matching connectors and connectors according to different products.Some high-precision tests may require special adapters to confirm connections are correct and airtight.
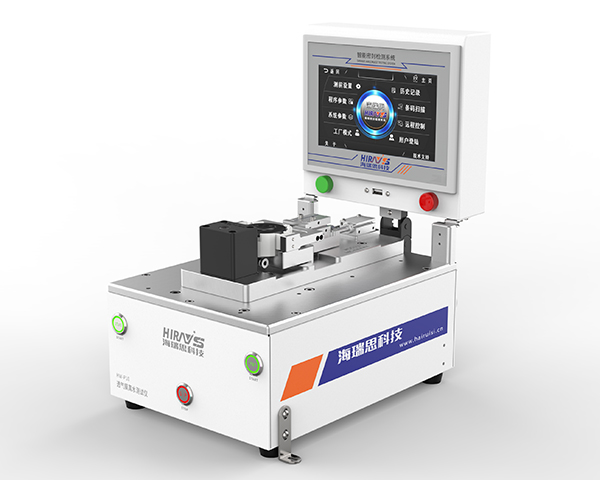
- Confirm that there are no leakage points: During the connection process, ensure that there are no leakage points at each connection part. Any small leakage may directly affect the reliability of the test results.Use soapy water or a special detector to check for gas leaks at the joints.
- Protect the device under test: In some high-voltage tests, it is necessary to protect the safety of the device under test and the operator.You can use some protective equipment, such as compression springs, protective covers, etc., to prevent accidents.
4. Start the test program and monitor the results
It’s finally time to witness the results!But put down your popcorn, monitoring is more important than you think.
- Start the test program: Press the start button according to the previously entered parameters, and the test program will automatically start running.Make sure there is no human interference during the run to avoid data skew.
- Monitoring the test process: Although most modern air tightness testing equipment is equipped with automatic monitoring functions, artificial real-time monitoring is essential.Pay close attention to the parameter changes on the display during the test and record important data.
- Stop immediately if an abnormality is found: If any abnormality is found during the test, such as a sudden change in the test value or an alarm sound from the device, stop the test immediately and check the reason.Try the test again after troubleshooting.
5. Data recording and analysis
After working so hard for so long, how could we not record the results?Data is the most valuable resource. Only through scientific analysis of this data can products and processes be further optimized.
- Record data: After each test, record the data immediately, not only to track the test results, but also to provide a basis for subsequent analysis.Modern devices often have data storage capabilities, but manual backup is also important.
- Analysis results: Analyze the air tightness of the test product based on the recorded data.If abnormal data is found, perform cause analysis in a timely manner and make corresponding adjustments.
- Save report: Generate a test report and save it, which is a formal record of the test process and results.The report content should include test equipment, test parameters, test results and analysis suggestions, etc.
in conclusion
Through this guide, I believe you have mastered the basic requirements and operating procedures for using Hairesi airtightness testing equipment.From equipment installation and calibration settings, to connecting the product under test and monitoring results, to final data recording and analysis, we analyze each step in detail and provide corresponding suggestions.Although the operation process may seem trivial, it is these details that ensure the accuracy and efficiency of the test.I hope this guide can serve as a beacon of light on your road to air tightness testing and lead you to the other side of success.
Like every challenge in life, learning to use airtight testing equipment requires patience and care.But when you see the accurate data results, you will find that it is all worth it.I hope this guide will bring convenience to your work and help you to be comfortable in the field of air tightness testing and gain full harvest!
-
2026.04.11Good News | Hirays Honored as "Most Investment-Worthy Enterprise" at 2026 AI Glasses China Tour
-
2026.04.11Why are more and more companies opting for RGA technology for power bank electrolyte leakage detection?
-
2026.03.30Commemorating the revolutionary martyrs and inheriting the red spirit | Record of hirays’s theme activity of walking to commemorate the martyrs’ cemetery
-
2026.03.20Starting from June, the sale of non-compliant power banks will be banned: many companies ignore this detection issue
-
2026.03.16After charging 70% in 5 minutes, how can the safety of the power battery be maintained?
-
2026.03.14Overcoming difficulties and showing responsibility, efficient delivery wins praise - a tribute to the four pioneer employees on the production front line
-
2026.03.03Comparison of mass spectrometry technology applications: How do Heris helium mass spectrometers and RGA series enable precision manufacturing?
-
2026.02.26Construction has started | hirays starts a new journey of struggle in 2026
-
2026.02.06Let’s work together to embark on a new journey | The 3rd hirays Fun Games was successfully held
